Series 5, Episode 6, Prinsesstårta
I was pretty nervous about making this one, a few people had mentioned it to me when talking about my challenge and I wasn’t sure how well I could pull it off. Here’s a link to the recipe: https://www.bbc.co.uk/food/recipes/prinsesstrta_17336
I got all the ingredients for this about 5 days before I planned to make it and noticed that the shelf life of the raspberries was quite short. For that reason I made the jam a few days early. I also made the rose the day before to save me a bit of time on the day because I wasn’t going to have a lot of time. If I’d bothered reading the recipe tips at the bottom properly I’d have probably made the custard or marzipan the day before too, but I managed to fit everything in the time I had (just about).
The last time I made jam it was too runny so I wanted to avoid that happening this time. Here’s the jam bubbling away:

I love that it looks like lava so that you know it’s too dangerous to touch. It got to 104ºC a little bit after this photo was taken and had plenty of time to cool, then chill in the fridge and was set beautifully.
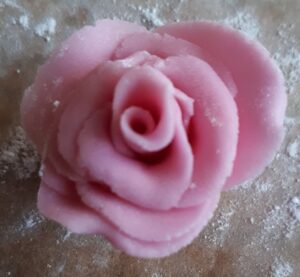
The day before cake day I sat down and made a little flower to go on top. I’m not that great at making pretty models and the instructions for this rose were clear and easy to follow so I was really pleased with the end result:
 I’m a pro at making custard now. Mary Berry describes it much better than I could so I have no further advice to suggest for that part of the process – just enjoy the satisfaction of seeing the custard thicken up when it’s ready. Another thing I’m getting quite good at is deciding what to do with leftover egg whites. If you follow my on instagram you might have already seen the flødeboller I attempted to make but this used the leftover egg whites AND some of the leftover marzipan.
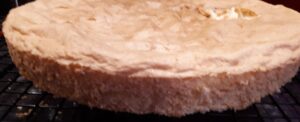
The 9 inch tin I had wasn’t a springform one but I used it anyway; I had confidence it wouldn’t get stuck and it didn’t. It had a good rise to it but then sunk down a bit after it cooled down
 I had to cut this horizontally into 3 layers! I thought about using the technique I used for the tiramisu cake but couldn’t find anything the right size to rest my knife on. Instead I used cocktail sticks to mark around where I wanted to cut it and did an ok job with 3 cakes approximately 1 cm high.
When it came to assembling the cake the recipe gave fractions of how much of each component to use. Since I’m no good at eyeballing this sort of thing I weighed how much I was using so that I knew when I was supposed to be putting a quarter of the custard into a piping bag I was putting a quarter in. Here’s the layer with the jam in:
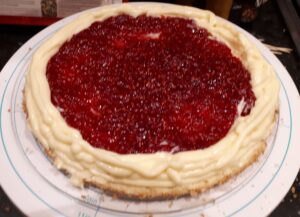
The jam was set much better than the last time I made it so stayed where I put it. For the next few layers I measured everything as before, but when it came to the layer with the whipped cream I was a bit worried that there wouldn’t be enough left to make the dome. Some of the custard had started coming out of the sides of the cake, which meant I could use that to coat the sides, but by the time I’d got all the cream on the top and started shaping it I could see that there was a small dome forming so felt better about it. I didn’t manage to get a photo at a good enough angle to show this so you’ll just have to trust me.
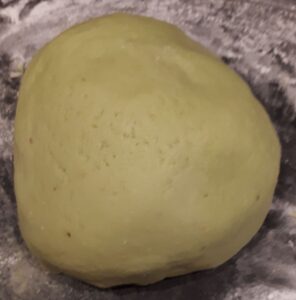
In my head I’d decided that marzipan was really difficult to make because I’d just NEVER thought to do it… It’s really not, it’s so simple. The most difficult and time consuming bit was adding the food colouring to get it to the right sort of green. I think I could have gone brighter but my arms were tired of kneading at this point. Here’s the marzipan in a lump:
It tasted really good but was slightly more gritty than shop bought marzipan. If you didn’t want it to be so gritty then you could probably put the ground almonds in a coffee grinder to make them a bit finer or sieved to get some of the coarser bits out, but for me, I didn’t mind at all.
Rolling out the marzipan was pretty easy but I was really worried about the whole cake collapsing when I put the marzipan over the top (I’d made the whipped cream on top a little thicker than I usually would have done because I was worried about this).
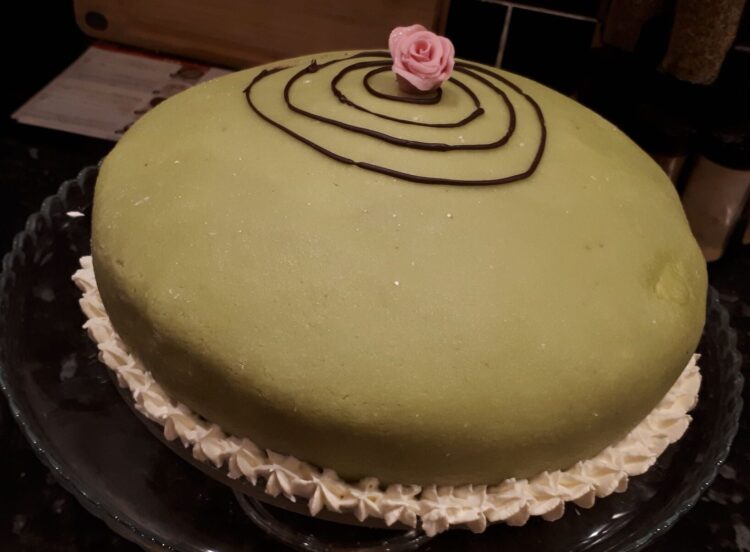
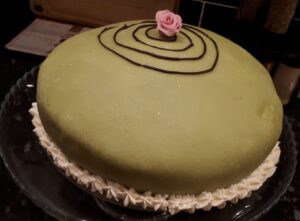
It didn’t collapse! I made sure to shape the marzipan round the sides rather than smoothing over the top to keep it in place and it did the trick. I did have a tiny bit to patch up but I didn’t let myself get too upset about it. A quick finish with the cream round the sides, a rushed chocolate spiral on the top because people were arriving, rose on top and finished:
Here’s a photo of the inside so you can see the layers:
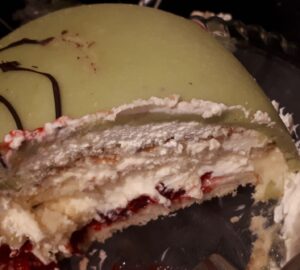
I’d just like at this point to apologise for my awful photography skills. Hopefully it gives you enough of an idea of what it’s like though!.
This tasted delicious. A bit like a trifle but nicer. The jam tasted really fresh and you couldn’t really tell that it was full of seeds. It was quite similar to the frasier cake I made a while ago but more raspberry jam and less strawberry and lemon flavour. Overall it was less daunting than I thought it would be, a bit extravagent maybe but it is fit for a princess after all. Maybe if I were to make it again I’d buy the jam and marzipan out of convenience but I’m really glad I made the effort this time.
Lily

February 15, 2022
Mom
Wow that looks delicious, worth the bother I bet ❤️